Crazy crazy weather around here this past week.
On Tuesday we had a 5.8 earthquake that originated in Virginia. No damage here - thank goodness - but a bit unnerving nonetheless.
Today, just four days later, we are anticipating the arrival of hurricane Irene. It's pretty nasty out there. We're far enough from the coast to be relatively safe, but I'm not sure if BGE will keep that power running! We have plenty of food, water, flashlights, batteries, and candles to keep us safe, though. And, of course, plenty of board games, books, and alcohol. ;)
I have some projects to share, but want to get this computer shut down and unplugged.
Good luck to all on the East Coast! Stay safe!

Saturday, August 27, 2011
Tuesday, August 16, 2011
starting to get depressed.
Yep. It's that time of the year. School starts for me in two weeks. Two weeks. Where did the summer go? I have so many things I wanted to accomplish that I didn't even begin.
There's a lot on the design board right now. I seriously need to sit down today and do a WIP list. I've been wanting to participated in WIP Wednesday, but haven't gotten that organized yet. Maybe today?
We had some cute visitors to the garden on Sunday...that cheered me up a bit.

They were so amazingly precious, it was all I could do to not pick one up and snuggle it! They did let me get pretty close, though!
A couple of new projects in the works...the big one is my Little Apples quilt top...
Trying to make the most of these last two weeks!
Tuesday, August 9, 2011
make mine modern swap finished.
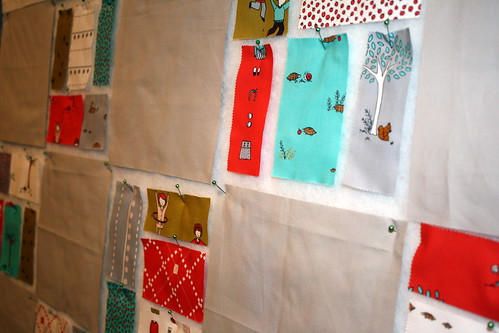
Finally finished up the wall hanging for my swap partner over at the MMM Swap.

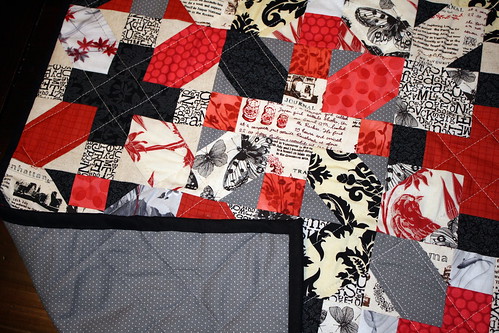
I really, really, really love the way it came out. Not the colors I would have necessarily chosen for myself, but I think it all came together very well.
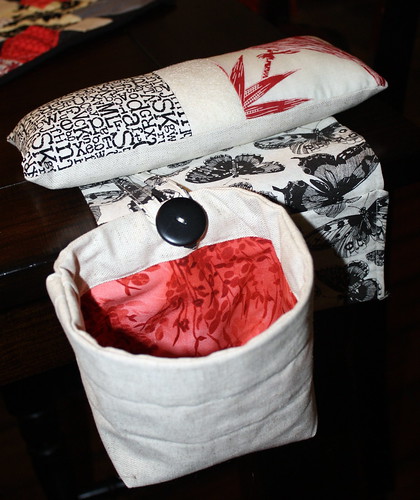
I also made her a pincushion organizer using this tutorial in matching fabric.
And some pretty notecards.
Here's the whole package:
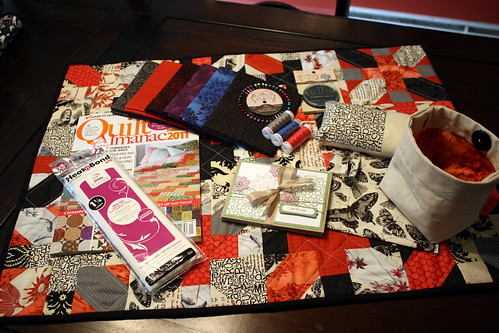
I hope she likes everything! It was challenging, but I tried very hard to match her style based on her photostream. In the mail it goes!
I really, really, really love the way it came out. Not the colors I would have necessarily chosen for myself, but I think it all came together very well.
I also made her a pincushion organizer using this tutorial in matching fabric.
And some pretty notecards.
Here's the whole package:
I hope she likes everything! It was challenging, but I tried very hard to match her style based on her photostream. In the mail it goes!
Thursday, August 4, 2011
getting (and giving) presents.
I received a package in the mail from Elizabeth (QuiltyGirl2) for the Sewn Spaces Needlebook swap. Either she's psychic or I did a great job on my survey, because she was dead on.
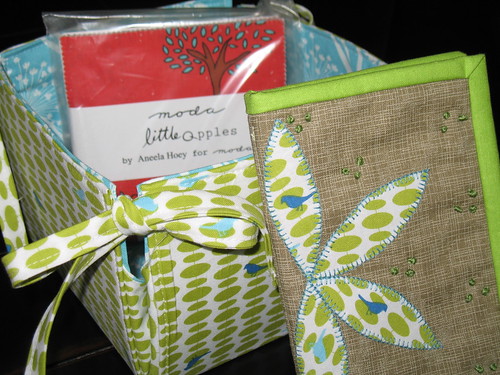
The basket and needle book are absolutely beautiful and I'm seriously drooling over the Little Apples charm pack. I'm going to be spending a good part of my day today searching for the perfect quilt pattern for this line! So far I'm loving this and this, but I think I'm leaning toward a version of this.
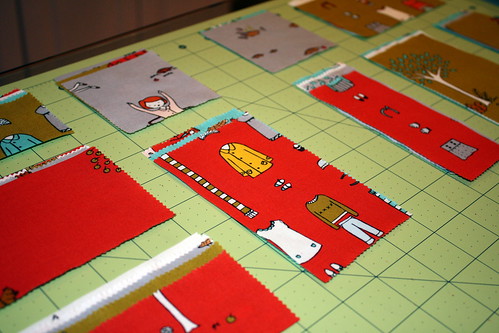
I've been working on several gifts as well. I'm still plugging away at my MMM Swap projects. My partner gave me virtually - no, literally - no information about herself. I've been going off of the five or six favorites she finally added to her profile and some pictures in her photostream. So frustrating. But, being the perfectionist I am, I'm driving myself nuts trying to make sure that she will like what I've put together for her.
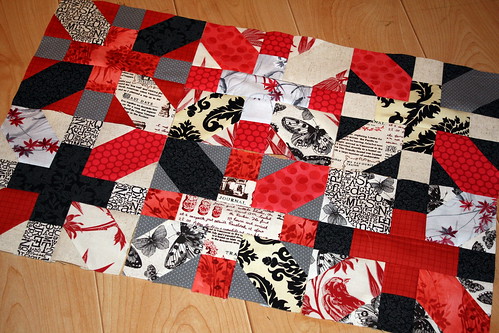
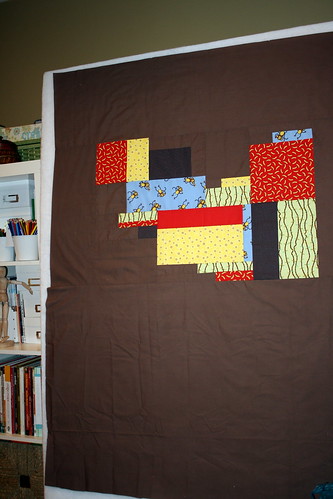
This is slowing becoming a wall hanging. I am really enjoying the Japanese x and + pattern and will probably be doing a version of this for my home at some point as well. The wall hanging is ready for binding now, and I'll be sharing photos of the finished product soon.
It's quite a year for babies as well. So far I know of three couples that are all expecting their first, and I'm sure I will find out about more when I return to school in the fall. I have a few plans for various baby quilts, of course. I'm loving this pattern, which I'm playing around with using my Wee Folks charm pack. I've also been working on this...
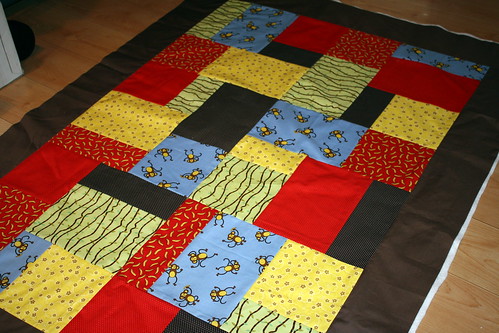
I'm not sure what line this is. It's actually a fat quarter stack that I picked up at Joann Fabrics because I thought it would make an adorable baby quilt. The pattern is my own design and I'm completely smitten. I will definitely use this pattern over and over again.
I randomly pieced the leftovers for the quilt back.
No rhyme or reason to this, I just played. And I love the result. And I loved the process. I will definitely do this again and again!
Ready for quilting and binding...I have a busy last few weeks of summer vacation ahead of me! :)
The basket and needle book are absolutely beautiful and I'm seriously drooling over the Little Apples charm pack. I'm going to be spending a good part of my day today searching for the perfect quilt pattern for this line! So far I'm loving this and this, but I think I'm leaning toward a version of this.
I've been working on several gifts as well. I'm still plugging away at my MMM Swap projects. My partner gave me virtually - no, literally - no information about herself. I've been going off of the five or six favorites she finally added to her profile and some pictures in her photostream. So frustrating. But, being the perfectionist I am, I'm driving myself nuts trying to make sure that she will like what I've put together for her.
This is slowing becoming a wall hanging. I am really enjoying the Japanese x and + pattern and will probably be doing a version of this for my home at some point as well. The wall hanging is ready for binding now, and I'll be sharing photos of the finished product soon.
It's quite a year for babies as well. So far I know of three couples that are all expecting their first, and I'm sure I will find out about more when I return to school in the fall. I have a few plans for various baby quilts, of course. I'm loving this pattern, which I'm playing around with using my Wee Folks charm pack. I've also been working on this...
I'm not sure what line this is. It's actually a fat quarter stack that I picked up at Joann Fabrics because I thought it would make an adorable baby quilt. The pattern is my own design and I'm completely smitten. I will definitely use this pattern over and over again.
I randomly pieced the leftovers for the quilt back.
No rhyme or reason to this, I just played. And I love the result. And I loved the process. I will definitely do this again and again!
Ready for quilting and binding...I have a busy last few weeks of summer vacation ahead of me! :)
Tuesday, August 2, 2011
Modern Star Block Tutorial
I posted my trial bee block on the 4x5 modern quilt bee flickr page and was so surprised when the gals asked me to put together a tutorial for the group! This is my first quilting tutorial, so please forgive any errors and let me know if you have any questions.


Add a D 3 1/2" HST to the C side of each of the squares, lining the pieces up on one side as shown. The D 3 1/2" HST will hang slightly off the edge. Set the four units aside.

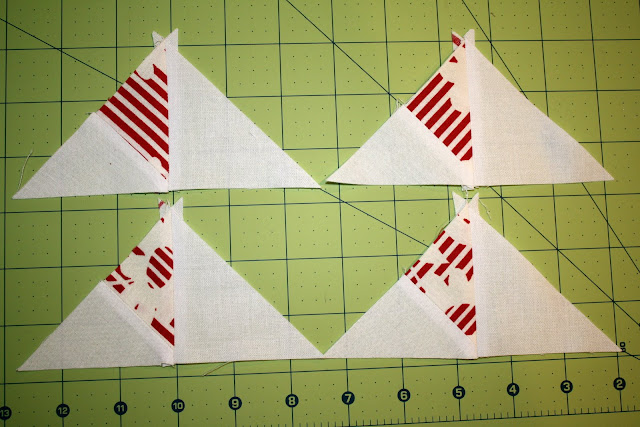
Sew together C and D 2 3/8" HSTs on their short sides to make four larger triangles.

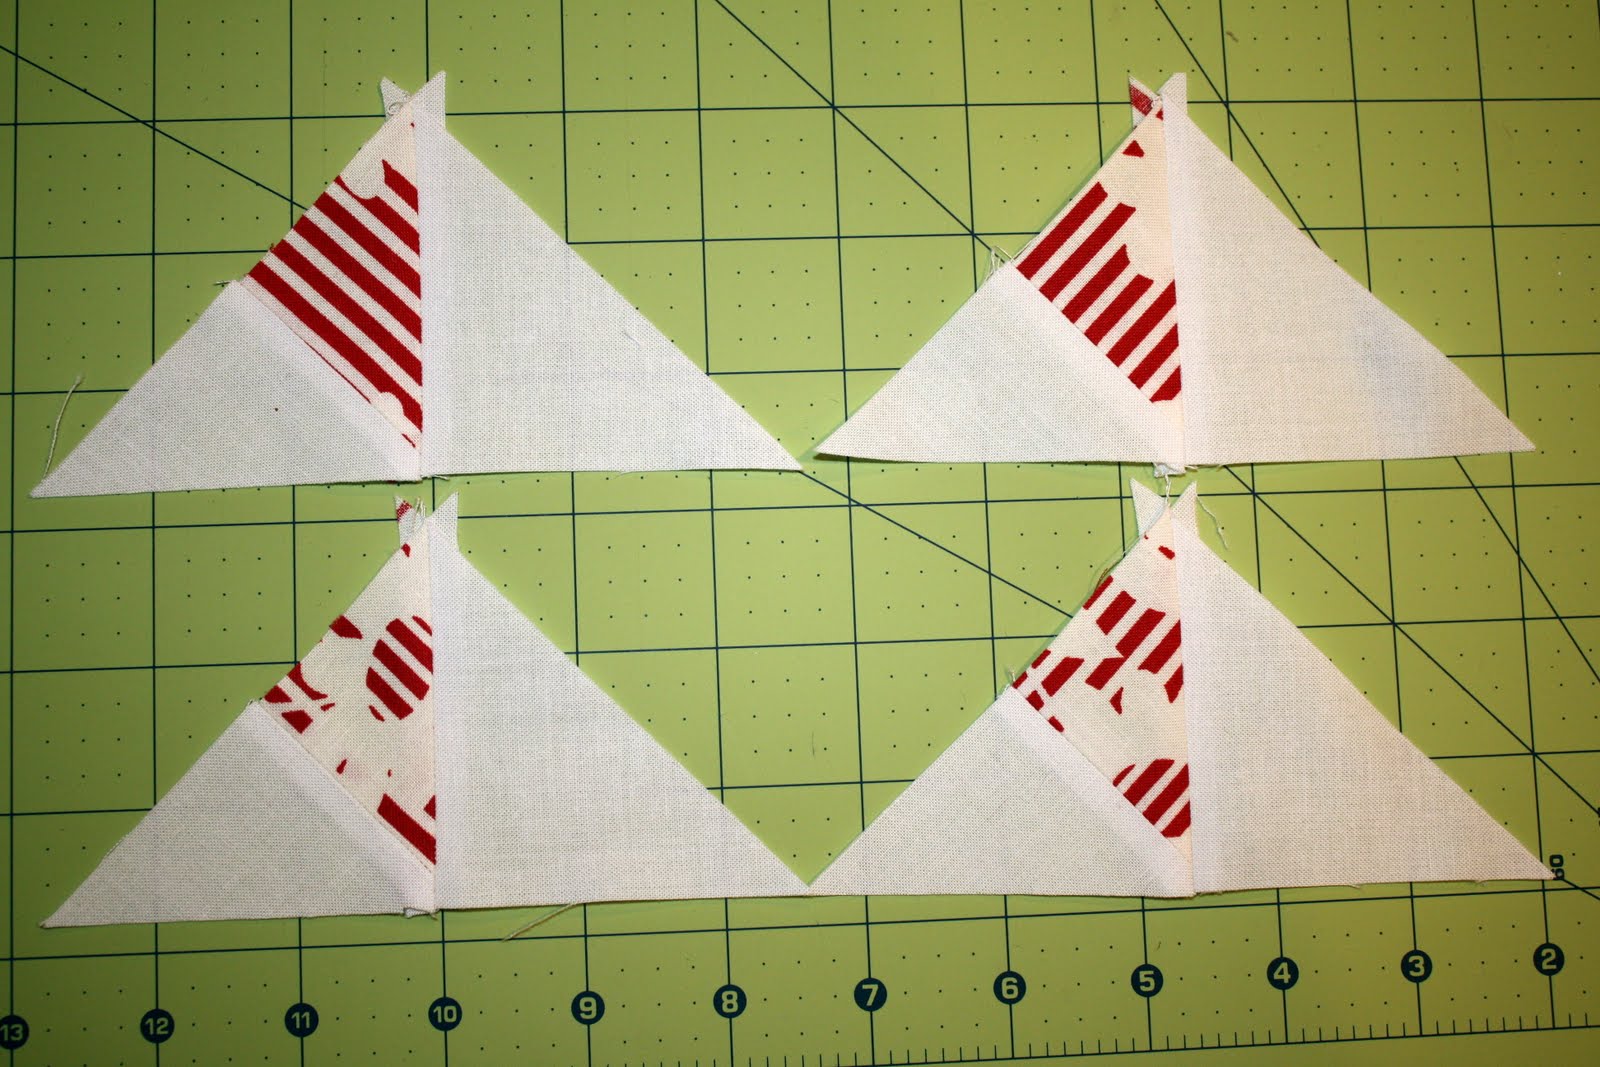
Sew a D 3" HST to the C side as shown below.
Add the B 3 7/8" HST to the C side as shown below.

Add the A 5 1/8" HST to make a square as shown below.

Sew the long edges of the first units completed above to the A side of the squares as shown below. The edges of the D 3 1/2" HST will hang off as before.

Pin the D 2 5/8" square to the long side of one of the above units.

Sew from the edge of the 2 5/8" block to about 1/4" from the other edge.

Open and press, then working clockwise, add the next unit as shown below.


Continuing clockwise, add the next unit in the same fashion.


Pin the flap that sticks down on the left underneath the block to keep it out of the way.

Add the last unit, sewing the long edge. It should look like the photo below when you're done, with a slit on the bottom left.

Fold the block in half along the slit, pin, sew, and press.


Pin the D 5 7/8" HSTs to each long edge of the block.

Sew each side, open, press, and trim the block to 12 1/2 x 12 1/2 inches.
Thanks it! Please let me know what you think - and link below if you try the tutorial out! Enjoy!
Modern Star Block Tutorial

Block Size: 12 1/2 x 12 1/2 inches, unfinished
All seam allowances are 1/4 inch. Be sure to press after each step! I press all my seams open, which worked well for this block.

Cut the following pieces:
Color A (red print in sample):
- Two 5 1/8" squares, then cut on diagonal to make four 5 1/8" half square triangles (HSTs).
- Two 3 7/8" squares, then cut on diagonal to make four 3 7/8" HSTs.
- Two 2 3/8" squares, then cut on diagonal to make four 2 3/8" HSTs.
- Two 3" squares, then cut on diagonal to make four 3" HSTs.
- Two 2 3/8" squares, then cut on diagonal to make four 2 3/8" HSTs.
- Four 3" squares, then cut on diagonal to make eight 3" HSTs.
- Two 3 1/2" squares, then cut on diagonal to make four 3 1/2" HSTs.
- Two 5 7/8" squares, then cut on diagonal to make four 5 7/8" HSTs.
- One 2 5/8" square, fussy cut if desired (alternatively, you could use one of the fabrics above)

Add a D 3 1/2" HST to the C side of each of the squares, lining the pieces up on one side as shown. The D 3 1/2" HST will hang slightly off the edge. Set the four units aside.

Sew together C and D 2 3/8" HSTs on their short sides to make four larger triangles.

Sew a D 3" HST to the C side as shown below.
Add the B 3 7/8" HST to the C side as shown below.

Add the A 5 1/8" HST to make a square as shown below.

Sew the long edges of the first units completed above to the A side of the squares as shown below. The edges of the D 3 1/2" HST will hang off as before.

Pin the D 2 5/8" square to the long side of one of the above units.

Sew from the edge of the 2 5/8" block to about 1/4" from the other edge.

Open and press, then working clockwise, add the next unit as shown below.


Continuing clockwise, add the next unit in the same fashion.


Pin the flap that sticks down on the left underneath the block to keep it out of the way.

Add the last unit, sewing the long edge. It should look like the photo below when you're done, with a slit on the bottom left.

Fold the block in half along the slit, pin, sew, and press.


Pin the D 5 7/8" HSTs to each long edge of the block.

Sew each side, open, press, and trim the block to 12 1/2 x 12 1/2 inches.
Thanks it! Please let me know what you think - and link below if you try the tutorial out! Enjoy!
Subscribe to:
Comments (Atom)