
Modern Star Block Tutorial

Block Size: 12 1/2 x 12 1/2 inches, unfinished
All seam allowances are 1/4 inch. Be sure to press after each step! I press all my seams open, which worked well for this block.

Cut the following pieces:
Color A (red print in sample):
- Two 5 1/8" squares, then cut on diagonal to make four 5 1/8" half square triangles (HSTs).
- Two 3 7/8" squares, then cut on diagonal to make four 3 7/8" HSTs.
- Two 2 3/8" squares, then cut on diagonal to make four 2 3/8" HSTs.
- Two 3" squares, then cut on diagonal to make four 3" HSTs.
- Two 2 3/8" squares, then cut on diagonal to make four 2 3/8" HSTs.
- Four 3" squares, then cut on diagonal to make eight 3" HSTs.
- Two 3 1/2" squares, then cut on diagonal to make four 3 1/2" HSTs.
- Two 5 7/8" squares, then cut on diagonal to make four 5 7/8" HSTs.
- One 2 5/8" square, fussy cut if desired (alternatively, you could use one of the fabrics above)

Add a D 3 1/2" HST to the C side of each of the squares, lining the pieces up on one side as shown. The D 3 1/2" HST will hang slightly off the edge. Set the four units aside.

Sew together C and D 2 3/8" HSTs on their short sides to make four larger triangles.

Sew a D 3" HST to the C side as shown below.
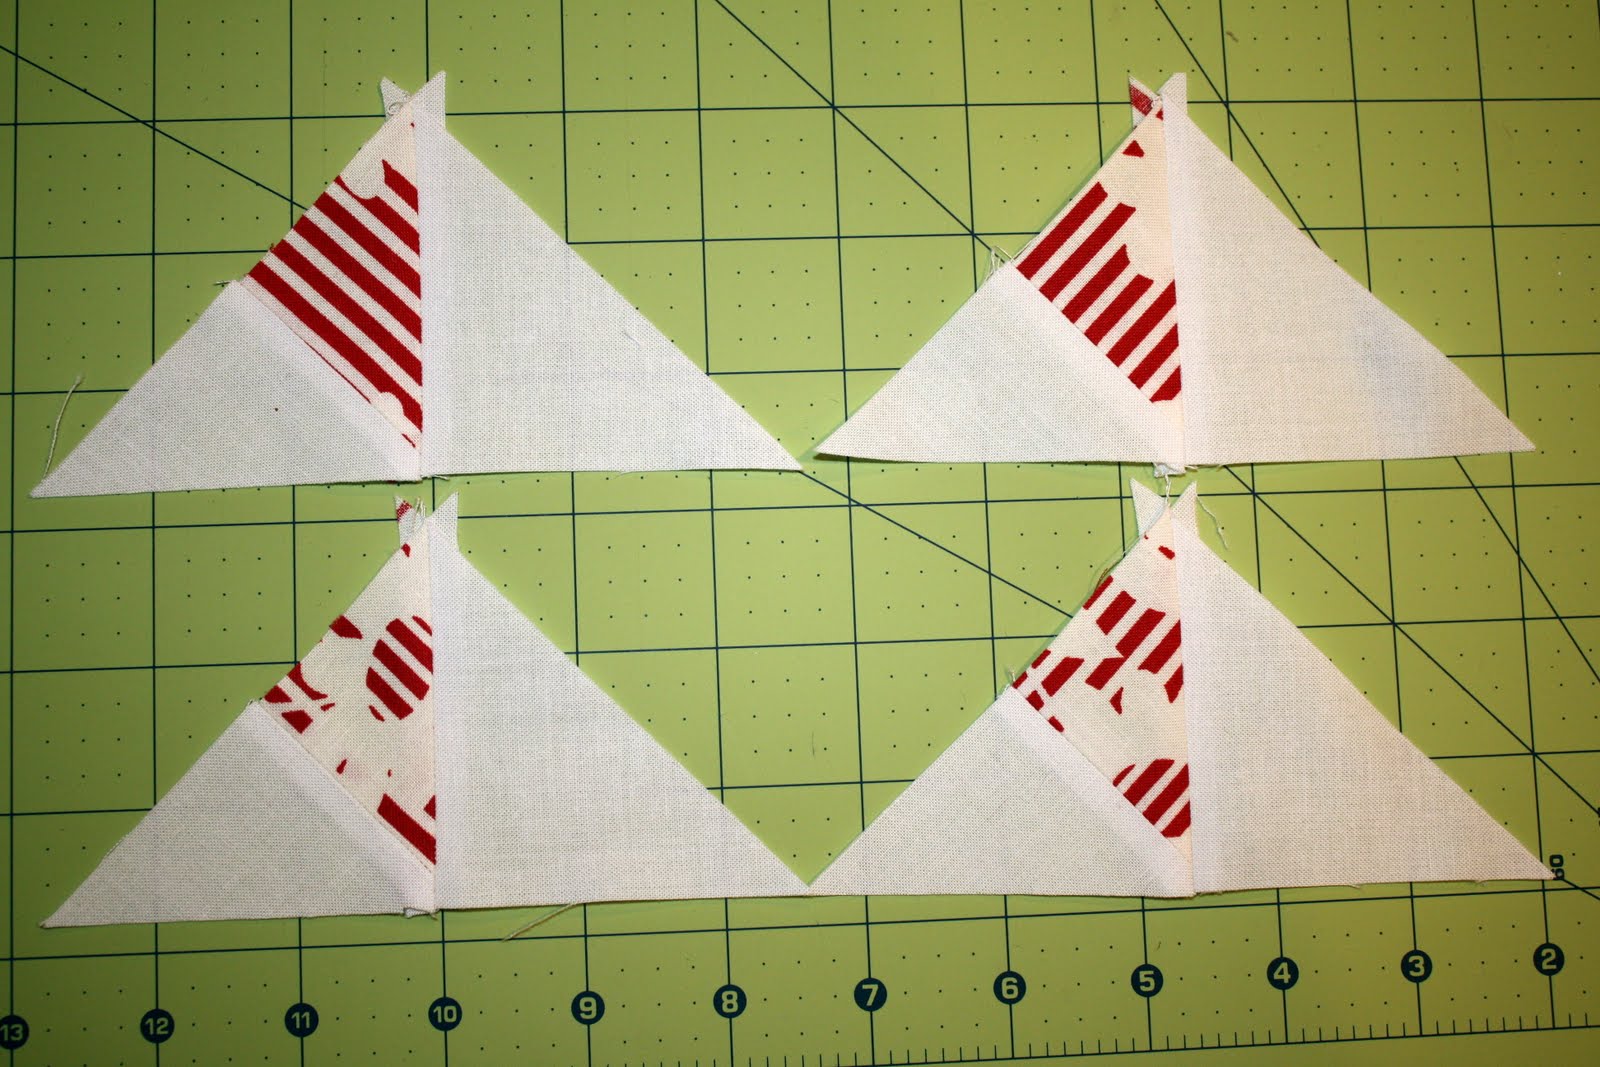
Add the B 3 7/8" HST to the C side as shown below.

Add the A 5 1/8" HST to make a square as shown below.

Sew the long edges of the first units completed above to the A side of the squares as shown below. The edges of the D 3 1/2" HST will hang off as before.

Pin the D 2 5/8" square to the long side of one of the above units.

Sew from the edge of the 2 5/8" block to about 1/4" from the other edge.

Open and press, then working clockwise, add the next unit as shown below.


Continuing clockwise, add the next unit in the same fashion.


Pin the flap that sticks down on the left underneath the block to keep it out of the way.

Add the last unit, sewing the long edge. It should look like the photo below when you're done, with a slit on the bottom left.

Fold the block in half along the slit, pin, sew, and press.


Pin the D 5 7/8" HSTs to each long edge of the block.

Sew each side, open, press, and trim the block to 12 1/2 x 12 1/2 inches.
Thanks it! Please let me know what you think - and link below if you try the tutorial out! Enjoy!
I absolutely never do y-seams, but this star is just so pretty I might try! Thanks so much for sharing a tutorial with us.
ReplyDeleteThanks for sharing this tutorial. Can't wait to try it out!
ReplyDeleteThis is a good tutorial and a wonderful block, thank you.
ReplyDeleteLainey, great tutorial! I think I'll make one!
ReplyDeleteWell done! Great looking block. Now I gotta go check out the rest of your blog.
ReplyDeleteAwesome tutorial Lainey! Thank you so much! I made this block up today, and it turned out great with your fabulous instructions! http://www.flickr.com/photos/melissablom/6054024582/
ReplyDeleteAwesome tutorial! Love the color combination.
ReplyDeleteHooo, this block tells me something ... Yes, I tried to do the same block and all was well until I realized that I had everything mounted upside down, despair, I am ashamed to show this disaster, bouuu
ReplyDeleteYours is beautiful
Christine (I live in france, I am part of the Name Game Swap
I love this block! I'm still a novice at sewing, but I tried this for an autumn-themed quilt I'm working on (my first quilt!). The tutorial and pictures are very clear and easy to follow, thank you for all the effort you put into it! It came together pretty quickly (if you ignore the many breaks I took to take care of my 4 month old!). Thanks for a great tutorial!
ReplyDeleteYou can see how my block turned out here: http://pinterest.com/pin/238198267763910793/
your steps are amazing to understand. Im so proud of what i made! im makeing my first quilt ever! and because of your amazing tutorial it came out perfect thank you so Much!!!
ReplyDeleteI just made this Modern Star Block. After some serious seam ripping, I'm done! No...not your fault. A bit of dementia or some such nonsense. It's a great block! It's going to be the center of my medallion quilt. Just wanted to say THANKS!
ReplyDeleteBeautiful block. Think I may give this a try. You did a wonderful job with the tutorial, very well explained with great visuals.
ReplyDeleteLove your colors :-D I have this block pattern that I got from the neighborhood quilt shop back in California in the early 90's...the name of the block I believe was called an aster block but I always felt it reminded me of a star block as well. Very nicely done. :-D
ReplyDeleteWhat is the yardage you used on the white? I want to make a quilt using this block but my yardage keeps seeming out of control
ReplyDeleteGreat tutorial. As a technical writer, I appreciate your clear steps and excellent pics illustrating each one. Thank you!
ReplyDeleteI finally made your quilt block and love it! Your directions are perfect!
ReplyDeleteThanks for the great tutorial!!
ReplyDeleteThanks for the tutorial! I'm a fairly newbie, somewhat brave and can sew like the dickens! I love this block. My father actually made this block out of different woods for the front of their home. It's about 36" of fabulousness!
ReplyDeleteThis comment has been removed by the author.
ReplyDeleteThis is the best , only the cutting is hard, the sewing is quick and easy.
ReplyDeleteI love this block.
I was a little overwhelmed at first, but I followed your tutorial step by step and it was easy to follow and such a nice surprise when it all came together. Thank you.
ReplyDelete